The hole in the wall is visible and you feel pretty awkward about it. You are anxious to get the whole thing fixed. How do you go about it? Most of us encounter this problem and are worried about how to patch up the dry wall and make the home more beautiful. Here is some advice on the same.
Materials needed
- Mesh tape – a medium sized roll
- Backer boards
- Patch up adhesives or compound
- 1-1/4” drywall screws
- Drywall board
Now moving on to the knowhow of it; you have the necessary materials for patching up the wall. Let us have a closer look into getting things done.
Step 1: Square up the hole
You all must be wondering as to why the hole needs to be cut into a square or rectangular shaped board? Isn’t the whole process counterproductive? Won’t it make the hole bigger? These are things running in your mind right now, isn’t it? Cutting a circular hole is more time consuming and it is more work than it calls for. So grab your drywall saw and drill a square shape off it.
Step 2: Patch up the hole with a backer board
Use 4 screws to hold the backer board in place. And countersink the screws just below the surface of the dry wall. Did you quite get it?
Step 3: Cut a new piece of dry wall
Dry wall is a sheet available in home centers or hard ware shops to patch up prevalent holes in the wall. Place the dry wall upon the already created backer board.
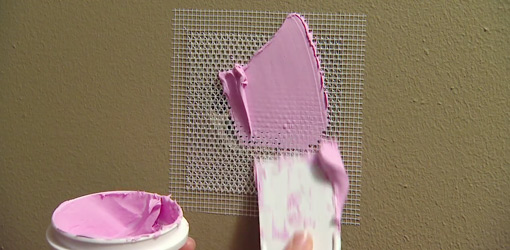
Step 4: Cover the joints with tape
Mesh tape has adhesive on one side which makes it easier to position. All the edges are covered with the help of the tape.
Step 5: Mix compound and apply first coat
Take the patch materials and relevant adhesives from the kit and make a mix. The mix need to be of a mashed potatoes consistency. Keep adding powder/water until you are thoroughly satisfied with the consistency.
Use a sharp spatula or a dry knife to apply a first coat of the compound. Smoothen out the edges. And evenly apply the coat across the portion covered with mesh tape. Remember that this is only the first coat and you have to long way to go to get the whole job done.
Step 6: Apply the second coat
You still need to smoothen out the edges of the patch up area. The dry wall makes a smooth transition over the repair. If you are a thorough professional there is no need for the final coat. You get done away with just two.
Step 7: Apply the final coat
Again for the final coat, smoothen out the patch up as far as possible. It will save you quite a lot of efforts in having to sand up.
Step 8: Sand Smooth
Use a sand paper to given a final touch to the coats and remove any kind of dimples or ridges. Make sure you feel everything with your hand. This assures you of whether the wall is even or not.
Step 9: Use a primer
It is a grave mistake to skip on the primer effect as the several coats of compound absorbs the paint differently. And without the primer, you will not be able to see a marked difference.
Step 10: Paint the portion of the wall patched up
You can take a dry wall sheet and paint one in the similar shade as your wall itself or paint out the portion on a chart paper with the help of sketch pens. Enquire with a hardware shop if he has similar shade of paints available. Get yourself a bottle of one and start painting the patched up portion of the wall. Else you can prepare a DIY paint mix yourself just in case he doesn’t have one available in his store. By following the set of techniques on how to patch dry wall, the wall now looks better than new.
COMMENTS